Assignment 2
A Graphics Virtual Machine
The purpose of this programming assignment is to give you programming experience with:
- Java control statements
- the public, private, static, & final keywords
- defining methods
- arrays
- GUI
- the JComponent paintComponent method (inherited by JPanel)
- the BorderLayout & GridLayout layout managers
- the Graphics drawImage method
A virtual machine is a computer program that is executed by a physical computer (directly or ultimately). The high-level architecture of our Graphics Virtual Machine (GVM) comprises a central processing unit that executes machine instructions that it fetches from a program memory, where the program to be executed is stored. The machine instructions are capable of reading & writing data memory, which is implemented an array of integer slots. The small instruction set is oriented, such as it is, towards producing graphical output (e.g., rectangles, ovals, lines) of various colors.
Specification
This application is organized roughly according to the Model-View-Controller (MVC) design pattern. The model is the GVM. The view is the graphics output of the GVM: Since this is a graphics virtual machine, the purpose of the programs that the machine executes is to programmatically "draw" graphics onto its image object. The controller is the rather simple control panel of the GVM. These application components are integrated in a Java application class, called App, which instantiates the 3 components. (Use of the name "App" is an informal naming convention.)
The App class
The App class implementation is complete.
Please study its details; in future assignments, rather than give you the App code, you will need to adapt the code below.
 1 import java.awt.BorderLayout;
 2 import java.awt.Dimension;
 3 import javax.swing.JFrame;
 4
 5 /**
 6  *
 7  * @author Pete Cappello
 8  */
 9 public class App extends JFrame
10 {
11     private final View view = new View();;
12     private final ControlPanel controlPanel;
13     private final GVM gvm;
14
15     App()
16     {
17         gvm = new GVM();
18         controlPanel = new ControlPanel( view, gvm );
19         setTitle( "Graphics Virtual Machine" );
20         setDefaultCloseOperation( JFrame.EXIT_ON_CLOSE );
21
22         add( view, BorderLayout.CENTER );
23         add( controlPanel, BorderLayout.SOUTH );
24
25         Dimension dimension = new Dimension( GVM.IMAGE_SIZE, GVM.IMAGE_SIZE + controlPanel.getHeight() );
26         setSize( dimension  );
27         setPreferredSize( dimension );
28         setVisible( true );
29     }
30
31     /**
32      * Run the Graphics Virtual Machine application.
33      * @param args unused
34      */
35     public static void main( String[] args ) { App app = new App(); }
36 }
37
The View class
The View class is a JPanel with 2 small changes:
- Its has an attribute that JPanel does not: a reference to an Image object (owned by the GVM). This reference is set by the controller, uisng a setter method that you must write.
- Its paint method draws this Image object;
 1 import java.awt.Graphics;
 2 import java.awt.Image;
 3 import javax.swing.JPanel;
 4
 5 /**
 6  *
 7  * @author Peter Cappello
 8  */
 9 public class View extends JPanel
10 {
12     private Image image;
13
14     @Override
15     public void paintComponent( Graphics graphics )
16     {
17         super.paintComponent( graphics );
18         graphics.drawImage( image, 0, 0, GVM.IMAGE_SIZE, GVM.IMAGE_SIZE, this );
19     }
20
21     // Declare a setter method for the Image attribute, to be invoked by the Controller.
22 }
The Controller
The controller has 2 controls: a Run button & a Step button:
- Run button: When clicked, the Controller directs the GVM to start executing the stored program, starting from its 1st instruction, which is in program memory address 0. It continues executing machine instructions until a stop instruction is encountered, at which point execution stops. At that point, the Controller directs the View to display the contents of the GVM's image by invoking the view object's repaint method
- Step button: When clicked, the Controller directs the GVM to execute the current machine instruction. After the GVM completes that instruction, the Controller directs the View to display the contents of the GVM's image by invoking the view object's repaint method.
Because the controller has a lot of Graphical User Interface (GUI) code that uses Java class libraries that we have not covered, I include that code in the skeleton given below. I will explain the organization of this code in class.
Please study its details; in future assignments, rather than give you the GUI code, you will need to adapt the code below.Note the contoller TEMPLATE CODE for each action comes in 2 flavors. One version uses the Java 8 lambda expression feature (see a tutorial on Java lambda expressions), & another version (commented out in the code given below) does not use this feature. If you are not running Java 8, use the pre-Java 8 version of the code.
You need to implement the methods runButtonActionPerformed & stepButtonActionPerformed. The former needs to invode the GVM run method, then invoke the view's repaint method; the latter needs to invode the GVM step method, then invoke the view's repaint method.
 1 import java.awt.GridLayout;
 2 import java.awt.event.ActionEvent;
 3 //import java.awt.event.ActionListener;
 4 import javax.swing.JButton;
 5 import javax.swing.JPanel;
 6
 7 /**
 8  *
 9  * @author Pete Cappello
10  */
11 public class ControlPanel extends JPanel
12 {
13     private final View view;
14     private final GVM gvm;
15
16     private final JButton runButton  = new JButton( "Run" );
17     private final JButton stepButton = new JButton( "Step" );
18
19     ControlPanel( View view, GVM gvm )
20     {
21         this.view = view;
22         this.gvm = gvm;
23
24         setLayout( new GridLayout( 1, 2 ) );
25         add( runButton );
26         add( stepButton );
27
28         initialize();
29         view.setImage( gvm.getImage() );
30         gvm.load(); // load program to be executed
31     }
32
33     private void initialize()
34     {
35         //------------------------------------------
36         // contoller TEMPLATE CODE for each action
37         //------------------------------------------
38         // If you are running Java 8, use lambda expressions
39         runButton.addActionListener( ( ActionEvent actionEvent ) ->
40         {
41             runButtonActionPerformed( actionEvent );
42         });
43
44         stepButton.addActionListener( ( ActionEvent actionEvent ) ->
45         {
46             stepButtonActionPerformed( actionEvent );
47         });
48
49         // If you are not running Java 8, uncomment the code below
50 //        runButton.addActionListener( new ActionListener()
51 //        {
52 //            @Override
53 //            public void actionPerformed( ActionEvent actionEvent )
54 //            {
55 //                runButtonActionPerformed( actionEvent );
56 //            }
57 //        });
58
59 //        stepButton.addActionListener( new ActionListener()
60 //        {
61 //            @Override
62 //            public void actionPerformed( ActionEvent actionEvent )
63 //            {
64 //                stepButtonActionPerformed( actionEvent );
65 //            }
66 //        });
67     }
68
69     // _____________________________
70     //  controller for each action
71     // _____________________________
72     private void runButtonActionPerformed( ActionEvent actionEvent )
73     {
74         // your implementation goes here.
76     }
77
78     private void stepButtonActionPerformed( ActionEvent actionEvent )
79     {
80         // your implementation goes here.
82     }
83 }
84
The Model: The Graphics Virtual Machine
The GVM is the most complex component of the assignment.
Attributes
-
Data memory:
an array comprising 100 int elements.
It has several special memory cells.
The table below gives the data memory index & the function of the corresponding data memory int.
Data Memory Index Purpose 0 accumulator 1 x 2 y 3 width 4 height 5 red 6 green 7 blue - Program memory: This is an array (sequence of machine instructions) of arrays of int that holds the program to be executed. Each instruction in the program is an array of int that has either 1 or 2 elements. The 1st of these is the numerical operation code (opcode); the 2nd element, which only exists for some instructions, is the instruction's operand. The operational semantics of aach instruction is described below.
- Instruction address: an index into the program memory of the current instruction to be executed, initially set to 0.
- Color: The machine's current color: All things that are drawn are in this color. However, there is an instruction to change the current color.
- An Image object: Since this is a graphics virtual machine, the purpose of the programs that it executes is to programmatically "draw" graphics onto the image object. For the purposes of this assignment, the image size is 800 X 800 pixels.
- Graphics object: It is, in fact, the Graphics object of the Image, obtained via the Image getGraphics method.
Methods
- getImage: A getter method, invoked by the controller when setting the View's reference to an Image object.
- load: The method loads a GVM program into the program memory. For this assignment, its implementation simply sets the program memory to a particular GVM program, an int[][]. The code included in the skeleton implements this method with the basic program on which your assignment will be tested. If you want to do the extra credit GVM program, replace the basic program with yours. I encourage you to use symbolic program constants to improve the readability of your GVM code, (opcodes, standard data memory locations, etc.).
- step: If the current instruction address is not referring to a stop instruction, execute the current instruction.
- run: While the current instruction address is not referring to a stop instruction, execute the current instruction.
- executeInstruction( int[] instruction ):
This is a private method used by both the step & run methods.
It gets the operation code, which is the 1st element of the int array.
It uses this int in a switch statement, with a case for each opcode, implementing that opcode.
The set of opcodes is { 0, 1, 2, 3, 4, 5, 6 7 8, 9, 10, 11, 12 }.
The stop instruction (opcode 0) means stop executing instructions; the program has terminated.
The semantics of each other opcode is given below:
- set: Store the instruction operand in the accumulator; increment the instruction address.
- load: Load in the accumulator the data memory cell whose index is the instruction operand; increment the instruction address.
- store: Store the accumulator in the data memory cell whose index is the instruction operand; increment the instruction address.
- add: Add to the accumulator the contents of the data memory cell whose index is the instruction operand; increment the instruction address.
- zero: If the accumulator is not equal to 0, set the instruction address to the current instruction's operand; otherwise, increment the instruction address.
- goto: Set the instruction address to the current instruction's operand.
- setColor: Set the current color to the Java Color object contructed from the red, green, & blue data memory cell values ( use the Color( int R, int G, int B ) constructor) ; increment the instruction address.
- drawLine: Draw a line of the current color, using data memory values x & y for the starting point, & x + width, y + height as the end point; increment the instruction address.
- drawRect: Draw a rectangle with the current color, using data memory values x & y for the lower left coordinate, the data memory value of width for its width, & the data memory height value for its height; increment the instruction address.
- fillRect: Fill a rectangle with the current color, using data memory values x & y for the lower left coordinate, the data memory value of width for its width, & the data memory height value for its height; increment the instruction address.
- drawOval: Draw an oval with the current color, using data memory values x & y for the lower left coordinate, the data memory value of width for its width, & the data memory height value for its height; increment the instruction address.
- fillOval: Fill an oval with the current color, using data memory values x & y for the lower left coordinate, the data memory value of width for its width, & the data memory height value for its height; increment the instruction address.
A skeleton for this class is given below. You may want to add private helper methods to keep your program organization clean.
// imports go here

/**
 * Graphics Virtual Machine
 *
 * @author Peter Cappello
 */
public class GVM
{
    public static final int IMAGE_SIZE = 800;
    // other symbolic program constants go here

    // attribute type declarations go here

    GVM()
    {
        image = new BufferedImage( IMAGE_SIZE, IMAGE_SIZE, BufferedImage.TYPE_INT_RGB );
        /*
         * Set the GVM's Graphics attribute to the image's Graphics.
         * Make the entire image white, using a fillRect.
         * set the GVM's current color to black.
         */
    }

    Image getImage() { /* Your implementationm goes here. */ }

    void load()
    {
        // The basic testing program is given below. Replace it, if you want to go for extra credit. See below.
        // Note: I defined symbolic program constants (not shown in listing)
        // that enable this somewhat more readable version to compile.

        programMemory = new int[][]
        {
            { SET, 20 },  // ACC <- 10
            { STORE, X },   // STORE ACC -> X
            { STORE, Y },   // STORE ACC -> Y
            { STORE, WIDTH }, // STORE ACC -> WIDTH
            { STORE, HEIGHT }, // STORE ACC -> HEIGHT
            { DRAWRECT }, // DRAWRECT
            { SET, 255 },  // ACC <- 255
            { STORE, RED }, // ACC -> RED
            { SETCOLOR }, // SETCOLOR to red
            { LOAD, X }, // ACC <- X
            { ADD, X }, // ACC += X
            { STORE, X }, // ACC -> X
            { STORE, Y }, // ACC -> Y
            { STORE, WIDTH }, // STORE ACC -> WIDTH
            { STORE, HEIGHT }, // STORE ACC -> HEIGHT
            { DRAWOVAL }, // FILLRECT
            { LOAD, X }, // ACC <- X
            { ADD, X }, // ACC += X
            { STORE, X }, // ACC -> X
            { STORE, Y }, // ACC -> Y
            { STORE, WIDTH }, // STORE ACC -> WIDTH
            { STORE, HEIGHT }, // STORE ACC -> HEIGHT
            { FILLOVAL }, // FILLRECT
            { LOAD, X }, // ACC <- X
            { ADD, X }, // ACC += X
            { STORE, X }, // ACC -> X
            { STORE, Y }, // ACC -> Y
            { STORE, WIDTH }, // STORE ACC -> WIDTH
            { STORE, HEIGHT }, // STORE ACC -> HEIGHT
            { FILLRECT }, // FILLRECT
            { LOAD, X }, // ACC <- X
            { ADD, X }, // ACC += X
            { STORE, X }, // ACC -> X
            { STORE, Y }, // ACC -> Y
            { STORE, WIDTH }, // STORE ACC -> WIDTH
            { STORE, HEIGHT }, // STORE ACC -> HEIGHT
            { DRAWLINE }, // FILLRECT
            { STOP  }       // STOP
        };
    }

    void step()
    {
        // your implementation goes here.
    }

    void run()
    {
        // your implementation goes here.
    }

    private void executeInstruction( int[] instruction )
    {
        // your implementation goes here
    }
}
Feel free to add helper methods that enhance the readability of your program.
Basic GVM Program Output
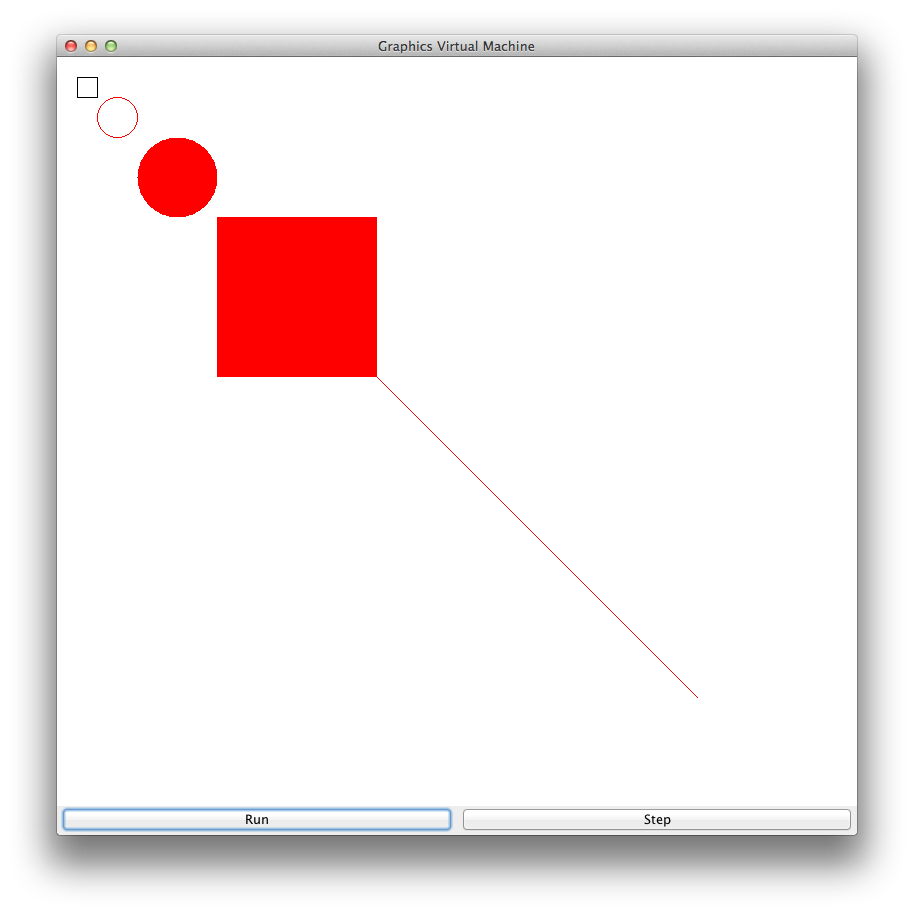
My implementation, when executed on the basic GVM program that is loaded by default, produces the following output. This is what we will test your implementation against.

Extra credit opportunity
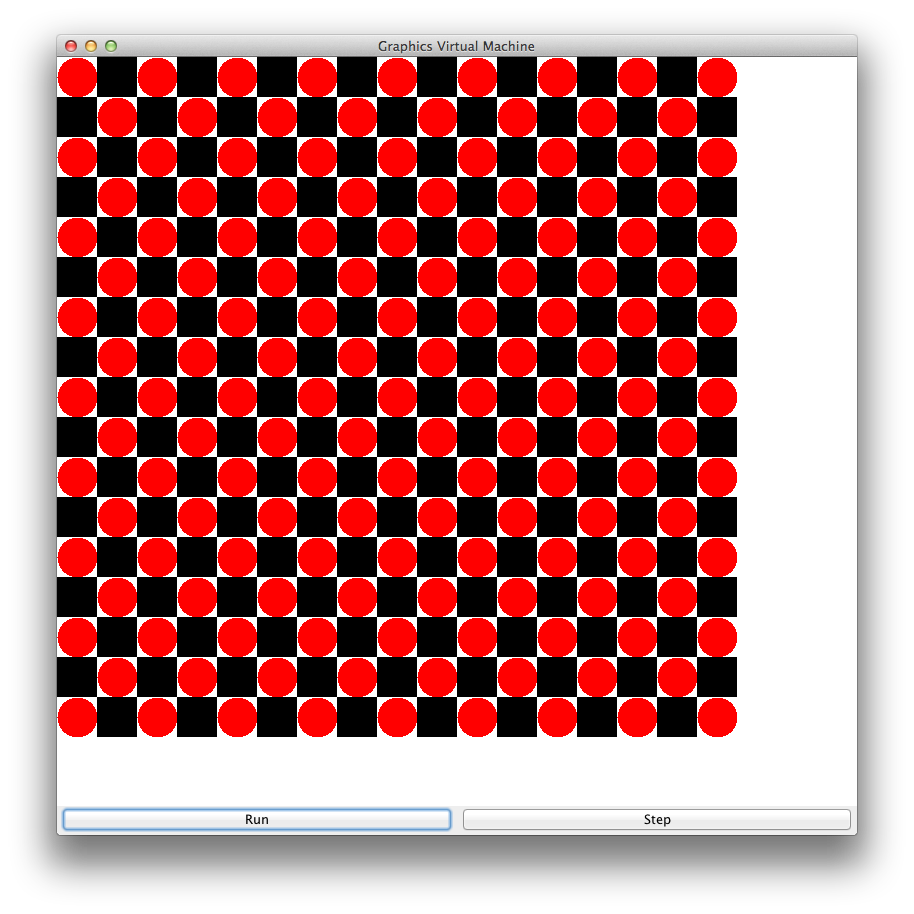
Below, the image generated by another GVM program is given. If you can write a GVM program to produce this image, you will receive an extra 40%.

Discussion of possible enhancements
There are many enhancements that can be made. Here are but a few:
- Arguably, the execute method could be encapulated in a CPU object, that has the instruction address & an executeInstruction method.
- The loader could read the program from a file.
- The loader could scan the program, detecting & reporting those program errors that can be detected when the program is loaded.
- There are no runtime guards to ensure that the contents of the special data memory cells is semantically valid (e.g., the data memory cell for red is between 0 - 255). Such violations are runtime erros. We currently do not even have a framework for handling such errors. It should catch runtime exceptions, & report them to the GVM application programmer.
- Add trace & debugging features.
- Modify the semantics of the goto & zero opcodes so that the operand is a number by which the current instruction address is incremented (+/-).
- Expand the instruction set.
- Make it a stack machine.
- Write an assembler for instruction set, primarily for labeling instructions & using them as operands on goto & zero operations. This would greatly ease writing programs for the machine.
- What enhancements would you like to see?
Rubric
| Value | Aspect |
|---|---|
| 1 | Compiles |
| 6 | Correctly produces the basic program output image |
| 3 | Style |
| 10 | Total |
For style, we want:
- Consistent application of some indentation policy;
- Carefully chosen, meaningful identifier names;
- Use of symbolic program constants in place of literals;
- Thoughtful comments, where needed, expressed in concise, precise English.
- Organization of the computation into methods that enhances readability.

